Thursday, October 25, 2012

Jefferson County Potters Holiday Sale!

The Where: Elkhorn Mountain Inn 
                  and the Montana City Store
                   1 Jackson Creek Rd
                   Montana City, MT

The When: Friday, November 30, 2012 - 5pm-9pm  Opening Nite/Sale
                  Saturday, December 1, 2012 - 10am-5pm Sale
                  Sunday, December 2, 2012 - 10am-2pm Sale

The Who: Gary Anderson, Chad Carignan, Lisa Ernst, Tom Jaszczak, Page Kelly Piccolo, Wiebe Pottery and Tara Wilson

The How: There's plenty of parking in the back, just come in through the motel entries. There are two doors on the front and one through the courtyard in the back. Come on in to the conference room, and spend some time picking the perfect HANDMADE gift for those lucky people on your list! There will be a lot of handmade items to choose from, and you'll be helping to support your local economy.

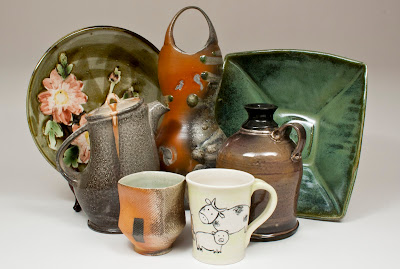
Please enjoy the images below, they give you a taste of the array of fine pottery you'll see at the show.

A group of cups and a lovely bottle.

I liked this one, it sparked the idea for the final

Playing with composition

The final postcard image

One of the postcard contenders

A collection of cups

The back of the postcard

Thursday, October 18, 2012

The evolution of an idea

Some times as an artist my process is a long thought out, drawings, test runs, then final product. A lot of times my process is one of inspiration in the middle of doing something else completely and I just jump feet (head?) first and usually, somehow, I come out with a really great step in the right direction.

When it comes to my series of Blessing Bowls, however, it started with a complete accident.

I was working in my studio on some bisqueware that I was going to take to the Archie Bray Foundation to fire. I had been taking a community class to dust off some techniques and they were doing some of the last cone 10 firings they were going to do before switching to Cone 6. I had my bowls laid out on the table, and I had just purchased a bottle of wax to put on the feet. After opening the bottle, I started to set it down on the table next to the bowls. As I was doing that I was also turning away to grab something else, probably a sponge. So here's me - great multitasker that I am - perfectly dropping the bottle onto the floor. Plop! The bottle landed on it's bottom . . . the wax went straight up into the air . . . and landed all over everything. I think the bottle tipped onto its side after the bounce. I think I was stunned into silence for a couple of seconds, and then my training as a Class A Cusser kicked in.

A very horrified and upset me set to cleaning up the mess. I'm just here to tell you, cleaning up cold liquid wax is kinda fruitless. You can absorb some of it into paper towels, but it never really quite gets out of the floor. Never mind bisque. When I finally got brave enough to look at the damage on my bowls, I realized that they were actually pretty interesting patterns. Knowing that these bowls were going to be fully vitrified in the firing, I thought, "what the hell, I'm going to glaze these anyway."


My husband had been wanting some bowls to catch his guitar picks and other instrument paraphernalia in, and I thought these would be perfect for that.  One of my best friends saw them and said she wanted one for her altar as a blessing bowl to keep various stones, shells and sticks she finds on her hikes. She also has one to hold her Angel cards and other affirmations. What started out as “Splatter Bowl” changed to “Blessing Bowl” because these bowls attracted people who wanted them to be the vessels that held their special things.

The way I finish these bowls as changed from using a wax resist that would leave unglazed areas on the bowl to using three different glazing techniques and in some cases adding laser printed decals. First I dip the bowls into the base - either an alabaster satin or glossy black glaze - then sometimes I hand splatter a glaze with a brush. Finally I spray the inside and outside of the rim with a third glaze.  This still conveys the original feeling of the original “Splatter Bowls” while adding another level of depth. The bowls then get their second firing, and then decals may be applied and fired.

These bowls have evolved in their size, presentation and colors.  They can be hung as artwork as well as serve your favorite soup or a dish at a gathering. Many folks have been giving these bowls as holiday gifts as well as wedding and anniversary gifts. What started as an horrified accident is now an idea fully in bloom and these pieces have become happy heirlooms.


One of the first "Splatter Bowls"
Detail
This is a shino version of the Splatter Bowl, cone 10 gas Reduction.


The foot ring allows for a wire to be wrapped so the piece can be hung.


The second step in the evolution. Loved the blue!


From here the rest are current versions of the blessing bowl. All Cone 6 electric.


Saturday, September 29, 2012

Spray Booth Blues

When I was in my old studio, before I had my darling daughter, I decided that dipping and brushing glazes onto my pots was not for me. My drawing skills are not great, my painterly skills are average, and my imagination just simply did not seem to run like the wind when it came time to put glaze to bisque. I dreaded it. It was predictable. Boring.

I needed some inspiration, and I needed a new technique that would allow some unpredictability and excitement in my glazing practice. Throw some of this process out of my control. Allow for some spontaneity. I chose spraying as my new technique and I began to look at the tools I had on hand, and the tools that I might need. Turns out, when you have a window, a compressor, a box fan and a respirator, you have what you need. And I was off and running.
Not the prettiest, but it did work. And it made a mess.
In my new studio space, I had specifically designed a location for my spray booth that was going to be a "real" spray booth. I wanted to be able to smoothly transition from one work space to the next, not have overlapping purposes that inevitably meant the set up and tear down cycle that added time to my creative process.

Well, sometimes all the planning in the world doesn't help one bit when it comes to real life. The space that I thought was going to be really nice and big and have great work flow, just isn't quite what I had imagined it to be. My drawings and scales were accurate, but my mind's eye was just a touch out of focus. That whole wall that was going to be ware shelves, glaze booth, and glaze storage ended up with a big ol' foundation wall sticking out 6 inches and about 42 inches tall making it not nearly as much floor space, or streamlined as I'd hoped. So in any case, the placement of the booth was simply not going to go there. It had to go in front of the other window, which is lower to the floor and much easier to get to. Now I had to build my booth.

Thanks to some input from some friends on Facebook, I'd gotten a couple really great ideas for temporary booths that helped me get some work completed as soon as possible. The first was two large storage bins that I then cut up and reassembled because I really thought a hard-sided booth was in order. Easier to clean, help prevent blowback, and I thought the clear bins would at least allow some light through.
Good Ol' Box Fan is back, and I am using a plaster hump mold to catch the glaze drippings.

Shown with a large pot for scale.
The problem became storage. Where the heck did this thing go when I wasn't using it? It can't stay outside after being rinsed down because it will blow away, and besides it's ugly. I don't want to be known as the "Junkyard Potter" in my new neighborhood.

What I tried next was a super-sized plastic garment bag hung from the ceiling. I cut a hole out of the back and thought it would be much easier to store because it's soft and would roll up and I could clip it to the closet rod I had it hanging from.
Plastic Garment bag as spray booth.
And, I have to say, if I never had to move this to get it out of the way or clean it, this would have worked really well. You zip it up after you're done spraying and the mess stays inside. IF you don't have to move it. But I did. So instead I got a big mess of dried atomized glaze everywhere. Not to mention having to climb up to take it down. Ugh. Not healthy, and damned messy.

So I had to decide. Was it really important to be able to set up and break down the spray booth every time? Well, no, actually the opposite would be much more attractive. I would really love to have a spray booth that doesn't have to be set up and torn down. ever. The reality was I had to be in front of that window to exhaust to the outside, which was why I wanted the stuff to get moved out of the way - so I could have as much natural light as possible. Also, storage and horizontal surface space is very precious. Finished pots and pots-in-progress have to be put on a flat horizontal surface. Display is important, but worksurface is crucial. I needed to keep the shelf that I'd been using as my glaze booth surface available to use for other things.

And then it occurred to me. I had this plastic storage cupboard that I'd started to use for a damp/dry box. But it's just a touch to narrow. My bats fit, but the door doesn't quite close all the way. I was going to just start using it when I was using my bat inserts for things like cups and small bowls. But it would be empty wasted space for most of the time. Epiphany! And with a little modification and some studio rearranging (again), I now have a permanent, hard-sided, easy-to-clean spray booth.
The new booth!
This is the perfect size, the height to window ratio is dang near perfect and with some further alterations, this is going to work just great. The furnace filters fit just right in my new opening, the plastic back that I had to take off fits perfectly on top of the fan in the window to prevent blowback, and there are shelves to store all the bottles and spray gun and whatever other things I decide to stash in there. Nevermind that it's plastic and can be easily cleaned.

As for my alterations? I am going to figure out how to raise that shelf to fit more evenly with the bottom of the fan. Right now it's about 4" too low. I am also going to drill a hook  or a cup holder in there, either on the door or on the side to hold my spray gun when I'm turning a pot over or getting more glaze.

As for my Spray Booth Blues? I think I've rocked them right out of here, though I'll be sure to let you know after I've actually gotten in there and used the dang thing!!

Monday, September 24, 2012

Open Studios Tour

I have long wished to have my own space where I can work and experiment and play with mud, fire and glazes. I wanted this space for many reasons. One: if something gets dropped, wrecked, misfired, misglazed, or generally screwed up there is only one person to blame. Me. The myriad of other reasons include the solitude, knowing where everything is, being able to check on work in progress at any time, and so, so many more reasons. But the reason that applies here, to this post, is that I can have people from the general local population come to me. To my dedicated studio door. And, let's be completely honest, to buy my wares.

And now that I have that space I immediately signed up for the local Public Arts Committee Open Studio Tour.

Nevermind that it was the weekend following THE. BUSIEST. WEEKEND. EVER. Because I build homes to pay the bills, you see. And the weekend before the Tour was the Parade of Homes. Where 676 folks came through my house to judge the level of craftsmanship and design style I have, and hopefully a few of them will hire my company to build them a home.

I digress. Instead of thinking to myself, "perhaps you should not do the Tour the weekend following the Parade" I instead think, "Hey- here's my chance to let people know I'm here and I make great pots!" Friends and relatives looked at me with pity, probably thinking to themselves, "there she goes again, when will she learn?" And actually saying to me, "Are you out of your mind?!"

Work made and getting bisqued before the Tour.


Some quick vases drying to get into that pre-Tour bisque!

So, needless to say, I signed up for both available days, went to the printer to get directional signs made because I do kind of live in the sticks, and started making some work and making a plan. I even cleaned the studio, priced my completed work and set up a display!


The outside of my studio with my spiffy new sign!

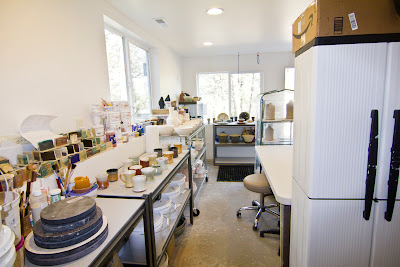
Studio all nice and clean!


Best angle on my display in the studio space. I need more shelves!


My husband and daughter were all set to keep each other entertained, I had access to cash, credit card processing, I even made a 'wrap your purchase' station. I drove out to the end of the road and back tracked with my signs to help folks find me. I was ready.

And I threw pots. And more pots. Sections for large pieces (see my previous post on how THAT turned out!). Jug forms and more jug forms. Because I love jugs. And not a soul did I see. Not one. The entire duration from Noon to five.

Nice Jugs!

Section pieces.


And it's true, I was a bit bummed, but really, look at all the great work I got done!

So Sunday rolls around and I'm thinking that I've got a lot to do, and maybe there's a chance someone will come to see me. I certainly had handles to pull and pots to assemble and those last three jugs I just didn't get to yesterday. And after that, maybe I can start on that Honey Do list.

Needless to say, I got all of that and more done. I did meet a couple of very nice neighbors who decided to drop in, however.

Jugs with handles and the extras.

More Jugs and a platter.
Did someone request more salad plates?


For me, following a whole weekend (!!) in my studio, it was hard to be truly disappointed. How often do I get to do that? Never. But it does make one wonder, "Why?" Why did no one make the 7 mile drive from town to come see me? Did anyone go any further south to Jefferson City (15 miles from town) or Boulder (25 miles from town)? It could be because I am not a particularly well-known potter, especially in an area where sometimes it seems ALL the well known potters live here, or at least spent some serious time here. Through Facebook I spoke to a couple other artists on the tour, and even though they were in town, their attendance was very low. Less than 10 each day. So it leads me to think, without anything remotely resembling hard data, that on a nice September afternoon, people simply have other things to do.

Will I sign up for next year's Tour? You bet! Two whole days to spend uninterrupted in my studio without having to make excuses? In a heartbeat!!

Level Up!

As the name of my blog suggests, I have a tendency to wander. And so I do. And now I wander back here to share with you my experience of "Leveling Up!"

Level means a lot of things. One of which is that something is as flat and parallel to the Earth as possible. Very few things are, by the way, level. Anyway, another meaning - that people who play video games are familiar with - is gaining enough experience that you have achieved the next "Level" in a game. Gamers generally achieve this by running around and whacking things or collecting things. Potters, it turns out, achieve this by wrecking a lot of pots.

In my drying rack, this is 2 pots in four distinct sections for each: Foot, bottom body, top body, neck.

This is 2 pots in one not so distinct section after "Leveling UP!"
Here is the goal: I would like to hold a fundraiser for Care.org at the local arts center, The Myrna Loy Center. The theme of the work is the feminine vessel. The work that women do in their villages to raise their families, keep their homes, and improve their communities all involve large storage vessels. It is these vessels on a large scale that I want to focus on.

Now here is where the "Level Up" part begins. These pieces have to be thrown individually and then assembled because I simply do not have the strength nor skill to throw pots that are 20+ pounds. Thus pieces have to be made, and in some cases thought about and thrown in reverse, and then assembled.

The first of two I got the foot and bottom body assembled, then went to attach the top body and when I turned it over it went PLOP off the bat into a big mush on the lower pieces. Hmmmm. Maybe shoulda done that the other way and put the assembled piece on top of the new piece and then flipped it over. Okay, well I have another pot, that's alright!

So I get the foot assembled to the lower body, then I get the upper body and the lower body attached to each other and I even get them flipped over and back on my wheel, centered and everything. I stand up to reach in to secure the seam when, TRIP! I step on the pedal and the pot goes flying in one direction and I fell right on top of it. Which is why the above picture just shows flattened clay. Bummer.

But now, here I am, all experienced. I know which bad guys to whack, which coins to gather, and I'm ready to conquer this level and move UP to the next!!